Tuesday, November 26, 2013

Completing a Lamp started Ten Years Ago

This beautiful lamp was an abandoned project which sat on a shelf for over ten years.  It was supposed to be a gift for the creator's daughter .. She finally decided it was time to hand it over to someone else to finish.  And I got to be that lucky someone!  If you have any abandoned stained glass projects, please give me a call!  I'll be happy to complete your work for you.  Here are the steps to complete the lamp .. Click on any photo to enlarge for a closer look.

Here is this colorful lamp, as its been sitting for the past ten years.  It was covered with old flux and the original numbers, in silver and black indelible pen, were still clearly visible.  The exterior of the dome had been lightly soldered .. The interior had been fully soldered.


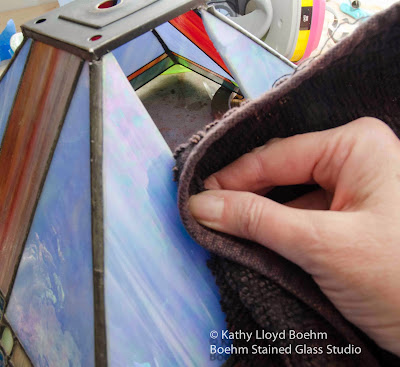
Here I've sprayed the interior with Kwik-Clean and am wiping off accumulated flux and dust.  

Removing the old flux from the outside of the dome, and removing the numbers, took several rounds of cleanser along with brushing and rubbing to remove it all.

This lamp held up very well over the years.  Only one piece of glass on the edge, shown, needed to be replaced.  Once I got the lamp reasonably clean, I re-soldered it in place after I removed the old foil and solder which surrounded it.
 There were several areas which had exposed copper foil which had oxidized over the years.  Here I'm using fine gauge steel wool to shine it up and prepare it for soldering.
 Since the outside of the dome had only been lightly soldered, I went around the dome and beefed up the majority of the solder lines using the same 60/40 solder as was used originally.

An important part of lamp construction is the wire which generally is soldered onto the outer border.  Since this lamp was never completed, I added the wire.  First I scrubbed down the surface edge of the border pieces with steel wool.

Then I taped down a few inches of thin wire at a time, using blue painter's tape as shown.  I centered the wire on the edge of each piece, then I soldered it in place.

Below, I've soldered the wire onto the border in sections.  Some are done, a few are not.  Eventually the entire border received the wire reinforcement.  This will add years of life to the dome.

Next, I turned my attention to the cap.  I removed the old solder, foil and flux which was on the inner border.  Then I lightly filed the entire edge, as shown below.

In order to have the cap be totally secured, I added new copper foil, this time in 1/4" for better coverage on the sides.

My customer's daughter chose this beautiful cap which is well ventilated for the heat generated by the bulbs.  I've added 1/4" copper foil to the edge of the cap.

Seen from the inside of the dome, I soldered the cap to the lamp and added in several lengths of flat, braided reinforcement wire. Some of the reinforcement runs in a circular path around the cap.  Others run from the cap to the edge of the pale blue glass, along the lead lines.  This will ensure that the cap will remain firmly bonded and secure.

Below, I'm applying Novacan Black Patina to the exterior of the lamp.  It is brushed on with an acid brush and works instantly.   Once the lamp is patinaed, it gets a full cleaning with Kwik-Clean spray.

Even after several cleanings, some residue remains, so I saturated several cotton balls with Goo Gone and removed the remainder of the flux and excess chemicals.  My intent was to apply black patina to the interior of the dome.  I purchased a 2" round brass brush (actually an attachment for a drill), but even with repeated brushings, the old solder would not accept the black patina.  This will not affect the esthetics or the luminosity of the lamp.  I simply waxed the interior of the lamp to protect the solder.  I also applied wax to the outer dome and the cap.

As I was soldering the cap, some solder inevitably creeped onto the brass.  As those who work with solder know, its virtually impossible to remove once it bonds with the metal.  Therefore, I tinned the entire cap and applied black patina to it, so that it matches the overall look of the lamp.

And finally, after ten long years, this beautiful lamp is in use, and its true beauty can be seen.  I can't wait for the owner and her daughter to see it and enjoy it!


Here's the view from above the lamp, showing all the gorgeous colors chosen for the lamp.  Great job here, Marlene!  Thanks so much for finding me, and for the wonderful stained glass supplies you gave me.  Everything has found a place.  Each time I use the supplies you and Sharon gave me, I'll be feeling very grateful!  Happy Thanksgiving!
Please visit my website to see my custom windows and repairs (click here).  And if you are on FaceBook, become a fan and I'll keep you up to date on all my stained glass projects.  Call me any time at 201-600-1616 or email with your questions. Thanks!

Stained Glass Cabinet Panel Made into Window Hanging

This pretty stained glass panel was once installed in a kitchen cabinet.  My customer had the idea of having it re-framed as a window hanging.  She went to three or four other stained glass artisans, each of which told her it either couldn't be done, or they wanted to charge her way above her budget.  As soon as I saw the panel I knew it was able to be converted to a panel and charged her a reasonable fee which was  below her target price.  Here's the process .. Click on any photo to enlarge for a closer look.

Here's the panel as it came to me.  I marked the top front of it with a square of black painter's tape.


The border was partially coated with paint, some rubber adhesive, and some old copper foil and solder.  The first steps are to clean off the border entirely.  Here I'm scraping off the paint with a razor knife.

To nudge the paint further, I'm now loosening it with a cotton ball dipped in paint thinner.

Part of the border had some rubber adhesive, as shown below.  I pulled off several lengths of it.

More rubber shown below.

 Here I'm pulling off some of the old copper foil.  After the entire border was cleaned of all old solder, foil, and rubber, I turned the piece over to my husband Eric for framing.

Below, Eric has attached the thin "channel" or metal frame around the piece.  In order to keep the metal frame in place, he's installed a "fence" or aluminum straightedge around the frame as shown. It is secured by pressing push pins into the work surface.

Here Eric is adding push pins to the outer edge of the frame to hold it in place.

Here, I'm apply liquid flux to the intersection of the frame and a lead line.  This will anchor the frame to the panel.


Shown below, the soldering to the border with the "fence" in place.

After the fence is installed, I "tinned" two brass hanging hooks.  "Tinning" means to apply a thin layer of solder.  For this process, each hook gets a thin layer of flux, then I solder each one as shown below.
 

The thin layer of solder acts as a sort of metal glue.  When the hook is placed at the appropriate place on the frame and the soldering iron is pressed down onto it, the solder melts and the hook is fused to the frame.  I added additional solder to the bottom and sides for an extra secure attachment.
 After the hooks were installed, I applied Novacan brand Black Patina to the entire frame and to the hooks.  This is applied with a metal acid brush as shown below, taking the patina from the bottle cap so as not to contaminate the bottle.

After applying the patina, I thoroughly cleaned and waxed the entire panel.  Then I added a length of black chain (not shown) to each of the hooks.  Here is the finished panel.
Thanks so much Patty, for not giving up your quest to have your kitchen panel re-purposed into a panel you can enjoy again.  Thank you for your advice on my violins, too!  It was a pleasure meeting you!

Please visit my website to see my custom windows and repairs (click here).  And if you are on FaceBook, become a fan and I'll keep you up to date on all my stained glass projects.  Call me any time at 201-600-1616 or email with your questions. Thanks!

Wednesday, November 20, 2013

Dale Tiffany Lamp Repair

This is the second Dale Tiffany lamp to come in over the past few months.  They are wonderful lamps to repair because the construction is predictable and well done and the glass is dense and colorful.  This lamp was damaged in a move even though it was securely packed.  The big challenge for this repair was finding matching glass.  That's always my first priority, to find glass which is a match, to minimize the evidence of the repair.  I managed to find matches after approaching four suppliers.  Here's the process.  (Click on any photo to enlarge).

Here is how the lamp came to me.  It was clearly hit very hard on the one corner, causing the two corner pieces to crack and the metal channel around the border to buckle.


A piece of the red iridescent glass on the side also sustained a crack.

In order to repair a lamp, it necessary to completely remove the cracked pieces, usually one at a time.  Here I've scored the red glass with the pistol grip cutter and am tapping on the back of the glass to break it out.

The tapping causes the glass to split into shards which I remove with needle-nose pliers.

Once the cracked glass is all removed, I use the pliers to pull off the old solder and copper foil around the edge of the piece.

Then I slide a piece of manila folder beneath the opening and I trace a pattern from which to cut a new piece of glass.

Below, I've outlined the pattern onto the red glass and scored it straight across from one side of the sheet of glass to the other.  Here I'm tapping on the score line to "loosen" the glass so it will split in a straight line.  Once it splits, I simply score and snap apart the piece needed for the repair.

After the piece is cut, I grind it with my grinder.  The grinding wheel is wet with the sponge as shown, which draws up water from the reservoir beneath the cutting surface.

After the piece is rinsed and dried, I apply adhesive copper foil to the center of the edges, all around the new piece of glass.

Then I press the foil onto the sides and edges of the glass using a flexible plastic wand or "fid."

To prepare the space for the new glass, I first spray it with cleaner and rub off any old adhesive with an old towel.  

The replacement piece of glass is then laid into the dome.  To prepare it for soldering, I'm applying liquid flux to the copper foil using a metal acid brush.

And here's the newly replaced piece after its been soldered.  After the inside of the dome is soldered, I rest the lamp in a large box of packing peanuts and solder the outside of the dome.  

The blue piece adjacent to the red had a small crack which turned out to be more of an issue than I first thought.  Fortunately, I had a good match for the glass in my inventory.  Below, I've used the same techniques as above and cracked out the blue piece.

Here's the new piece of blue, copper foiled and ready for soldering.


Frequently throughout the repair process, I clean the soldering iron by rubbing in on a block of sal ammoniac.  I'm always wearing a protective breathing mask during the soldering process.

Below, I'm taking Novacan brand Black Patina from the bottle cap and brushing it onto the  silver solder.  It immediately turns it black.  After it sits for a few minutes, I spray-clean off the excess and then let it dry to prepare for waxing.

Moving onto the border. below I've removed one of the cracked turquoise glass corner pieces.

And now with some coaxing, the old metal channel comes off too.

Here's the replacement piece of glass, foiled and ready for soldering.

One corner piece done, one to go.

 The other cracked corner piece is removed and copper foil is applied to the surrounding edges.
 

Trying the pattern on for size.  Its a good fit.

And here's the second corner piece, soldered in place.

Now all of the cracked pieces have been replaced and the old, bent metal channel framing has been removed from two sides of the lamp.  Below, my husband Eric is custom-cutting a length of new channel to snap onto the sides.

He presses the channel down onto the glass and secures it temporarily with painter's tape.  Then I solder it to the inside of the lamp dome for a neat finish.  Once the soldering is complete, I apply black patina to the new framing material, let it dry and then apply wax to the entire finished lamp.

And here it is, back in service, and ready to give its owner many more years of enjoyment!  Thank you very much Warren for finding me online.  It was a pleasure meeting you and repairing your beautiful lamp!
 Another view ..
Please visit my website to see my custom windows and repairs (click here).  And if you are on FaceBook, become a fan and I'll keep you up to date on all my stained glass projects.  Call me any time at 201-600-1616 or email with your questions. Thanks!