Monday, July 28, 2014

Stained glass Sidelights by Front Door

As the final touch for a newly restored home, we were asked to duplicate the original, leaded side lights as shown below.  They are approximately 6" wide and 33" long.  The originals were created using clear window glass.  The diamond-triangle pieces were done using a textured clear glass.  Here's a photo of the original leaded panel.  (Click on any photo to enlarge).


The view of the front door from the inside of the home showing where the side lights are located.
 Another view of the original side light.
 Here is my design for the duplicates.  I followed the same proportions.
 The pattern making process .. Tracing the markings on the "cartoon" onto Manila folders using carbon paper.  The layers are tacked to my work surface with push pins to prevent shifting.
 After the pattern pieces are traced, they are cut using stained glass shears, shown on the left.  These are double-bladed and cut out a thin piece of paper which allows for the copper foil which will follow later.  To the right are standard scissors, used to cut the outer border of the pattern.

 Now the pattern pieces have been cut.  Many have been organized into recycled envelopes as shown.

After looking through several examples of clear glass, my customer made a nice choice, clear waterglass cut in a vertical orientation.  Rather than do just clear for the diamonds and triangles, we decided that a nice green would work well with the exterior of the home and the furnishings.  I had a large sheet of hand-blown green glass which was given to me by a gentleman who was giving up his stained glass hobby.  The glass is a medium shade with lovely bubbles throughout.  Thank you again, Mr. Johnson, I hope you see your glass being put to good use.  It was the ideal choice for this project!

Below, I'm using a pistol grip cutter to score the outline of a piece of clear waterglass.

After the score is made, I snap it off using these blue "running pliers".

A few pieces of the green traced and cut.  After each piece is cut, I grind the edges in a grinder.  This is to assure safe handling and also to promote the adhesion of the copper foil.
 My husband Eric sets up a fence or "jig" around the borders of each side light.  This is to ensure that the cut pieces do not shift.  Here he's verifying the measurements.

 Now all of the glass for both side lights has been cut and laid on the cartoon.

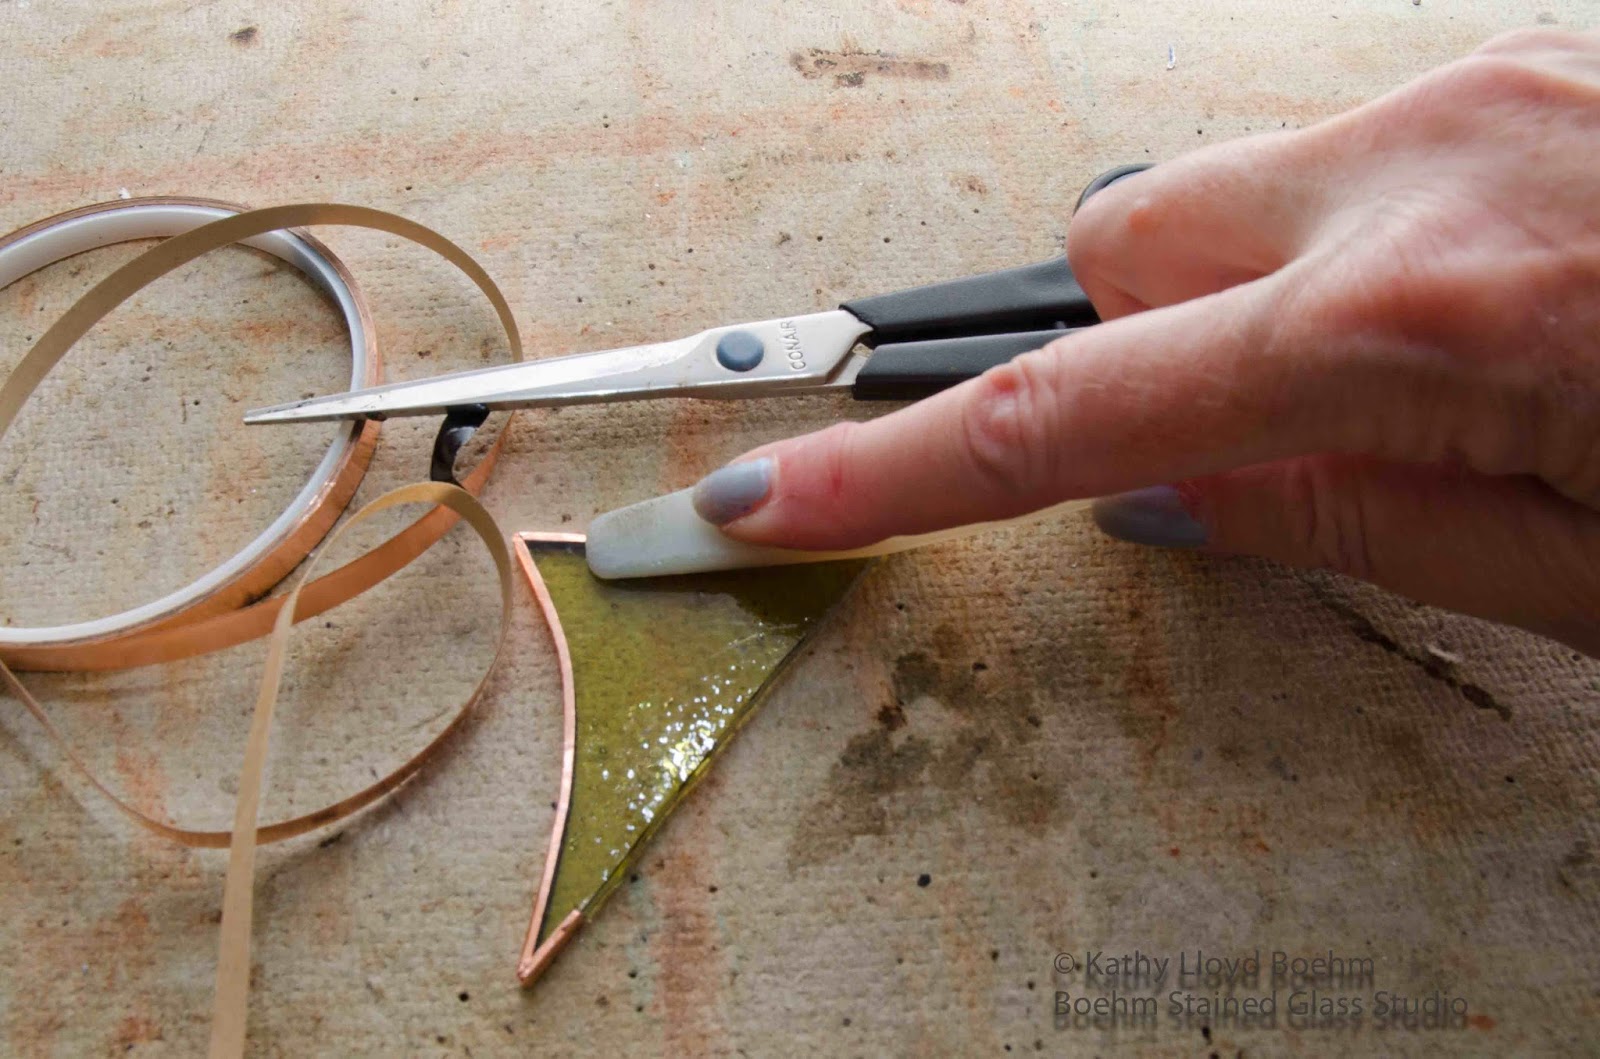
I remove each piece, one at a time, and apply black back copper foil as shown, to the center of the edge of each piece.

Using a "fid" or flexible plastic wand, I press the copper foil onto the glass.
 Now all of the glass has been copper foiled.

 Next, using a metal acid brush, I apply Blu-Glass Liquid Flux to the copper foil.  This is an agent which allows for the soldering.

Next I "tack-solder" the pieces as shown below.  I apply a dot of solder to the intersections of the pieces and at key points throughout the panel.  

 After tack soldering is complete, I remove the "jig" and slide out the cartoon.  This protects the cartoon from damage from the chemicals which follow.

Now I've fully soldered the front of each panel.

Next, I spray "Kwik-Clean Stained Glass Flux & Patina Cleaner" to the solder. Then I towel it off and allow it to dry.

My husband Eric is shown here cutting the angle for a mitered corner of the metal frame, which is made of zinc.

Here, Eric is placing the metal jig back onto the panel.  This time, its to hold the frame in place.  He'll do this for all four sides of each panel.

 Below, I've fluxed and soldered the mitered corners.  I've also soldered all the lines to the frame.  This gives added strength to the overall panel.

After I've cleaned off the flux again with Kwik-Clean, I apply Novacan Black Patina to the zinc frame and to the soldered lines as shown.  To prevent contamination of the supply, I take patina from the bottle cap and discard whatever is not used from the cap.

 Another cleaning with Kwik-Clean spray, and the panels are almost ready.

 Here they are, side by side after the patina has been applied.
 

I applied Liva Stained Glass Polish to both sides of both panels.  I propped them up to dry.

 And here is one of the two completed panels, ready for installation. It is resting in a custom-made holder that Eric made for me.
 Thank you so much Janice, for calling us in to replace your side lights.  It was a pleasure creating them for you.  We can't wait for you to see them "in person"!


Please visit my website to see my custom windows and repairs (click here).  And if you are on FaceBook, become a fan and I'll keep you up to date on all my stained glass projects.  Call me any time at 201-600-1616 or email with your questions. Thanks! 


Sunday, July 20, 2014

Photographing my Stained Glass Work for a Contractor

In April, I completed  a set of four stained glass kitchen cabinet panels for a home which had been destroyed in a fire.  Last week, the contractor hired me to photograph the entire home, exterior and interior.  Here are a few of my photos.


My stained glass windows .. Cabinet panels on each side of the copper range hood.  I custom-mixed the patina to a deep bronze to match the homeowners' cabinet hardware.


Below are my other two stained glass windows which are installed in a hutch cabinet on the back wall of the kitchen.


My stained glass windows in the hutch.
To see more photos from the shoot, please click here for Proof Positive Photography, my photo blog site.


If you are considering a green addition or renovation project, please contact GroundSwell Contracting, based in northern NJ.  Call Quentin Unsworth, (below) 201-855-6676. Please click here for their FaceBook page .. Or click here for their website.

Please visit my website to see my custom windows and repairs (click here).  And if you are on FaceBook, become a fan and I'll keep you up to date on all my stained glass projects.  Call me any time at 201-600-1616 or email with your questions. Thanks! 


Tuesday, July 15, 2014

Geometric Bathroom Windows

Recently, we were very happy to hear again from the couple who commissioned a pair of geometric stained glass windows for their downstairs bath in August, 2012.  Click here to see their first commission with Boehm Stained Glass Studio.
They are in the process of remodeling part of their home, including their upstairs bath, and that's where we come in again .. Another pair of double hung stained glass windows is part of the plan.  

Here are the windows.  They are also off the porch, as were the first windows we did.  Therefore, we needed to choose glass that would afford privacy.  We decided on a mix of glue chip, opalescent, rough rolled, 3/4" bevels, and 1-1/2" square bevels.

 
 Here's the inspiration .. Beautiful gray tile and glass pencil tiles that line the shower and walls of the new bathroom. 


I submitted two preliminary designs, and then my customer designed a third concept which incorporated aspects of windows she liked.  Part of the fun of custom work is being able to add elements from other sources to personalize the look!  Here's the computer rendition of her design of the two windows, top and bottom.  They are approximately 18" wide and 15" high.  (The gray-looking glass in the rendition is actually clear glue chip glass.)
 After my husband, Eric, took measurements of the windows, I made a paper "cartoon", shown below.  Then I laid down the 3/4" bevels along the sides and the 1-1/2" square bevels in the center.  These fixed-size bevels become the guide for the sizing and placement of all the glass which is to follow.

Since the design of these two windows are identical, I opted to prepare two separate sets of identical patterns.  I used different color manila folders, as shown below.  I did this to be sure that the correct pieces of cut glass were placed on the correct pattern.  When making patterns, I use regular carbon paper sandwiched between the "cartoon" and the manila folders. Then I trace the design and transfer all of the markings as well.  I used "regular" manila folders for the first window, and colored folders for the second.

 I cut each piece of the pattern with double-bladed stained glass pattern shears which allow for a small amount of space which will be taken up by copper foil later.  As pattern pieces are cut, I separate them into recycled envelopes by type of glass.

These windows called for many pieces of glass which needed to be 3/4" inch wide, to correspond with the 3/4" clear bevels.  In order to have consistency in the width, I opted to use my Beetle Bits Cutting System shown below.  I've had this system for a few years but had not tried it before.  As a newbie in need of more practice, my results weren't quite as promised.  It did prove to be a useful tool, though, which I will use on other projects which require cutting strips of the same size.


 Below are a few 3/4" strips made with the Beetle Bits Cutting System.

  Here are a few more cuts .. 1/2" borders made with Glue Chip glass.

Marked off below are three strips of gray opalescent glass, ready for snapping with the (blue) running pliers and then placement on the two patterns.  Notice the metal fence or "jig" which surrounds the border of the window.  This is in place to ensure that the piece of glass do not shift.


Pieces marked and being snapped with the blue "running pliers".  The next step is grinding the edges on the Glastar II grinder (below).

Grinding the edges of a clear piece of glue chip glass.  I usually wear "rubber fingers" for protection, but my leather-palmed gloves were nearby, so I wore them instead.

Here's a handful of rough rolled dark gray glass, ready for placement on the patterns.  I keep the number on the piece until it is placed on the "cartoon".

Below, I'm cleaning the tip of the soldering iron on a block of Sal Ammoniac.  The white smoke indicates that the carbon build-up on the iron is being burned off.  This process helps keep the tip clean and the iron hot.  Note that I am always safety conscious and was wearing a safety mask during this process.


Wearing my lead-protectant mask (seen here while working on another project).

Since working with stained glass involves handling lead, I also use "D-Lead Abrasive Hand Soap" after each work session.  Although it is abrasive, it is actually mild on the hands.

Back to the project .. After all the glass pieces have been cut, I apply black-backed Copper Foil to the edges of each piece of glass.  Then, using a "fid" or flexible plastic wand, I press the foil onto the glass as shown.  This prevents any liquids from getting under the foil.
For added strength, I randomly insert strips of "Re-Strip Copper Reinforcing Strip".  It fits between the foiled pieces of glass and becomes invisible after soldering.

Now, all of the glass and bevels have been foiled.  Notice that both of the windows are still enclosed in the metal "fence" or "jig".

The next step is the application of Canfield Technologies Blu-Glass liquid Flux.  This is an agent which allows for the soldering of the copper foil.  After I've applied flux to all of the copper foil, I add a dab of solder to each intersection of the pieces, to bond them together.  This process is called "tack soldering". Then I pull the push pins out and remove the "jig", and carefully slide the paper "cartoon" out from under the glass.

Now the fronts of both windows have been fully soldered and the "cartoon" has been slid out.  So now I'm cleaning the chemicals off using "Kwik-Clean Stained Glass Flux and Patina Remover".


Now my husband Eric measures and custom cuts a sturdy metal channel frame for each side of both windows.  Here he's using a Dremel cutter to make the angle for the corner.

Eric placing the frame on the edge of the window. 
After each frame is cut and placed on the edge, he replaces the "jig" against the frame to hold it in place while I solder the frame to the window.  I solder the corners first, then I solder each lead line to the frame for added strength.  After the fronts are soldered and cleaned, I carefully turn the windows over and solder and clean the backs.  The blue tape is marking the front and top of each window.
Below, I'm applying Novacan Black Patina to the solder.  After the patina is allowed to set, I again use "Kwik-Clean" to spray the patina and clean it off.  After the windows are dry, I apply Liva Stained Glass Finishing Polish to the front and back of each window.  This is a light wax which protects the patina and gives the glass a nice shine.

And here are the finished windows!   Thank you for having us back, Nancy and Roy .. It was a pleasure working with you again!  All the best in your "new" home!


And one more .. The computer rendition is on the right .. Finished windows on the right.

Please visit my website to see my custom windows and repairs (click here).  And if you are on FaceBook, become a fan and I'll keep you up to date on all my stained glass projects.  Call me any time at 201-600-1616 or email with your questions. Thanks!